March 29, 2011

Cold Frames are Easy!


Have you ever seen cold frames, hoop houses or other season extenders in catalogs, magazines or on the television? They're much easier to make than you might think. Cold frames give you additional ways to start seeds early, overwinter veggies, save some herbs for you or your dinner, or grow some nice native plants to put out in your gardens. Here in the Pikes Peak region we have a very short growing season, mine is approximately 90 days from last frost to first frost, so any help in extending it is most welcome!

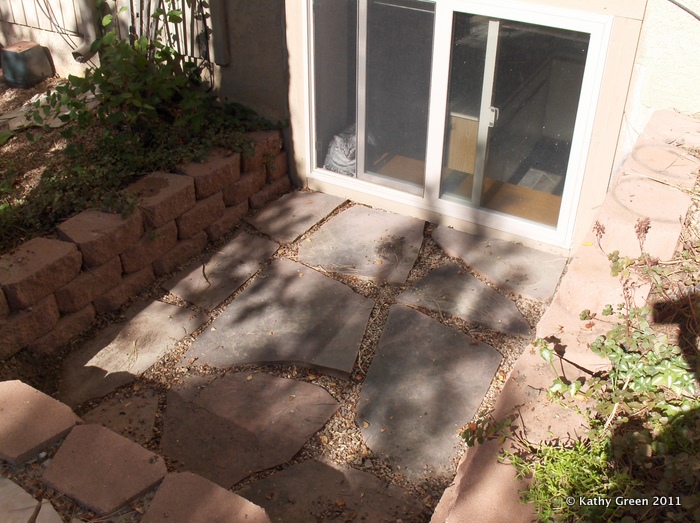
This is the space the cold frame sets into - about 5 feet wide
and 6 feet deep. The flagstone was set in previously, 
with gravel for drainage.  The half-height walls provide extra
insulation and wind protection.

Here's a simple slide show to give you an example of how to build a walk-in cold frame in the window well of your house. We built this 1 1/2 years ago to overwinter plants, and take off the plastic during the summer. You can build it to your exact specifications, and the parts can be purchased at any hardware store. It cost less than $30.00 to build, not including the shelving. Enjoy!


Having trouble viewing the slideshow?  Here's a direct link.

After having the walk-in cold frame up for a year, there's a few things I would change:

  • The plastic sheeting needs to be cut into 3 pieces to make it easier to open/close. A front, back and side piece would also allow better venting.
  • I would add extra supports along the top between each hoop because of the very strong winds we have here.
  • I'd remember to take off the window screen during the winter to be able to reach into the plants from inside the basement!
  • The low shelves I added last year (not shown) were made of repurposed boards that were not waterproof and so warped and expanded too much when wet. My new low shelves will have drainage to prevent that!

We also have hoop houses over the raised garden beds in the backyard, which can be taken down over the winter.  I'll post pictures of them soon, as they're very useful for season extenders, keeping critters out and are so easy to make!

If you'd like to find out more about building one of these in your yard and would like some hands-on help, contact me and we can setup a time to get started!

March 2, 2011

March Gardening in the Pikes Peak Area


5 Easy Tasks to help your Garden Flourish
Here at our high altitudes, it might seem that it takes forever for spring to arrive and plants to start growing again. We've had an abnormally dry winter along the Front Range, and in my gardens the soil could really use some of those late winter blizzards we often times receive. If the ground is warming up around your gardens, remember to do a check at least once a week to see if you need to do some watering. Mid-March is also a good time to check your trees and shrubs for any that may need pruning. This is best done while the plants are dormant. There are some plants that you should not prune in spring, such as lilacs, which bloom on last years growth.

1. If you are planting a vegetable garden this year, the end of March is a good time to start your tomato and pepper seeds indoors. In our area, the last frost date is usually about June 1st, not the May 15th that is quoted for Denver or Colorado Springs. For more exact date information, please check with your local county Extension Office or consult the lists of Average Frost Dates and Length of Growing Season. Remember that seedlings need a lot of light to grow well.  A simple shelf and light set-up lets you start many types of plants and can be re-used for several seasons.


2.  Clean up your tools and buckets. Use a bleach solution on your tools to get rid of any problems that might be hanging around from last year. Remember to dry them well and oil them before storing.


3. Walk around to see what is sprouting in your gardens. March usually means the crocus are up, some of the low growing ground covers are turning green, and perennials are starting to put out some new growth. It is still too early here to remove most of your protective mulches and/or last years leaves. Ornamental grasses may be showing signs of new green shoots. If they are, you can give them a hair cut by simply taking the plant, wrapping a string or cord around it about 6 inches from the bottom, and cutting off the top. Throw the old grass blades into the compost bin if you have one.


4. As noted above, you should prune your dormant woody shrubs and trees at this time. However, leave your rose bushes alone. If you prune them now, they will try to put out new growth, which will freeze out later in the spring. Also, leave the Russian Sage, Butterfly Bush, Spireas, and other sub-shrubs alone until sometime in Mid-April, when you should see new growth starting up at the bottom.

5. March is usually our snowiest month, with heavy wet snow and sometimes blizzard conditions. This beneficial moisture is great for the plant roots. If you are shoveling, put some of that snow onto the gardens instead of piling it along the driveway. This way, the water can soak into where it's most useful, and you will not have to start watering as soon. Taking the time to do this simple task translates into great savings on your water bill.

Remember, gardening is supposed to be fun, relaxing and enjoyable. It allows you to be out in nature, observing all the interactions between plants and wildlife of all sorts. Take it from me, you can always learn something new in your gardens!
Related Posts Plugin for WordPress, Blogger...